Unreal Engine 5 - The truth of the Gameplay Ability System
Hello, it’s been a long time since I have written a gamedev article, been busy with life.
If we talk about trending engines, we have to talk about Unreal Engine 5.
This brand new version of Unreal includes a number of features that enhance the experience of working with the engine. Such as Nanite, which with an avant-garde application of virtualized geometry technology, can allow for taking significant shortcuts when creating game-ready photorealistic assets.
However, these new goodies shall present developers with new challenges. For example, in Nanite we get presented with the following difficulties:
- Where to use it: Static opaque non-deformable geometry. Better explained in this list.
- Size: Compressed Nanite meshes often take more disk space than normal low-poly meshes.
- Overdraw: Dense overlapping geometry can cause performance issues.
- Profiling tools: If we want to use Nanite properly, we should learn these tools. For that, we have the following reference.
Most of these tools entail a shift in the way the industry approaches traditional problems. With Nanite, artists no longer need to go through the tedious retopology phase, which implies a reduction in the production cost for the development of photorealistic assets, as the length of the workflow, and thus the hours required for an asset to be considered game-ready have been considerably reduced.
The industry will of course adopt these changes. So instead of disregarding them because - “I’m so used to the old workflows and I don’t care” - we should always be down to explore new technology and study the new challenges as they come to keep ourselves up to date and, of course, relevant to the industry.
The Gameplay Ability System (GAS)
Another of these overwhelming new tools that has been around for a while is the Gameplay Ability System. I’ve seen lots of skepticism surrounding this tool, such as:
- It’s just too much!
- Stay away from it as much as you can!
- The learning curve is very stiff!
- It really doesn’t solve any problem…
Unfortunately, the story gets repeated, most of the disdain and criticism comes from people that haven’t worked in depth with the system. In this post, we’ll demystify and comment real pros and cons of the system.
The gist of it
What’s the Gameplay Ability System? The answer is simple, an ability framework which enables the creation of stateful systems through the usage of gameplay tags, abilities and mutable gameplay attributes. It is also complemented by a gameplay cue system for those juicy visuals. Let’s elaborate a tiny bit on them:
- Gameplay tags: Labels that you can add and remove to your game entities to denote a state or any other particularity free to interpretation in game code.
- Abilities: Encapsulated UObject that represents a coarse action in a game (ie. a dashing mechanic), it counts with high degree of controllability (ie. can’t execute if certain tags exist…).
- Gameplay attributes: Mutable float that you can add to your game entities. Can be conditionally mutated through Gameplay effects and other modifiers.
- Gameplay cue: These non-reliable events were created for visuals. Keep here your VFX and sounds.
And here is where we see the first issue:
GAS is one of those things... It isn't terribly complex.
But there's a lot of new concepts.

And until you really understand all the concepts, the design
doesn't quite fall together. So it feels like a lot of conceptual
effort to still be stumbling in the dark.

- ImmutableLambda
So… Something as “simple” as casting an ability is becoming complex? No… no, not really, who told you that? That’s not really the complication of the system. The next Section elaborates on how easy is to implement an ability with casting using the concepts explained above.
The pros: Implementing an ability is easy, I swear
To make things simpler and fairer, we are going to explore the Light Dart ability blueprint from the Valley of the Ancient Sample provided by Epic.
This ability is feature complete as it adds Tags, Cues, mutates some Attributes and employs the controllability offered by the ability system.
1. Activation controllability
Abilities expose a section in their Class Default Object (CDO) to define a series of conditions and actions to perform using the Tag system when attemping an ability activation.
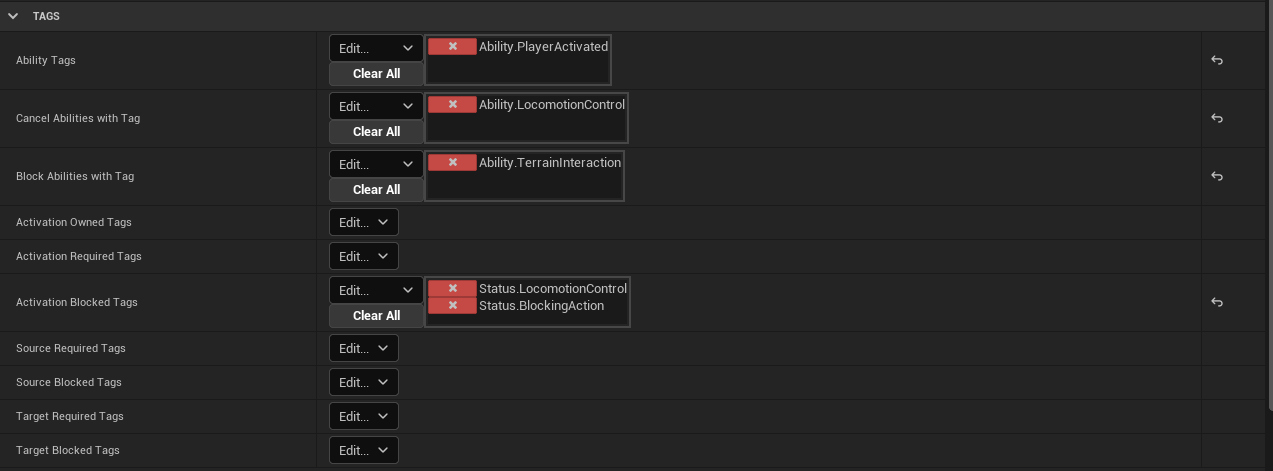
In summary, this ability does the following:
- Ability Tags: The Ability.PlayerActivated tag identifies this ability.
- Cancel Abilities with Tag: Cancels all the abilities with the Ability.LocomotionControl tag.
- Block Abilities with Tag: Prevents abilities with tag Ability.TerrainInteraction to be activated.
- Activation Blocked Tags: The ability is blocked if the activating actor/component has the Status.LocomotionControl tag or the Status.BlockingAction tag.
As we can see, the gameplay tag system shifts the paradigm towards stateful systems by providing a simple controllability interface in our abilities. In traditional systems this would be equivalent to a long and complicated if-else boolean statement chain.
2. On ability activated
Once the ability goes through its initial phase, the event ActivateAbility gets called. Let’s see the first phase of the ability.
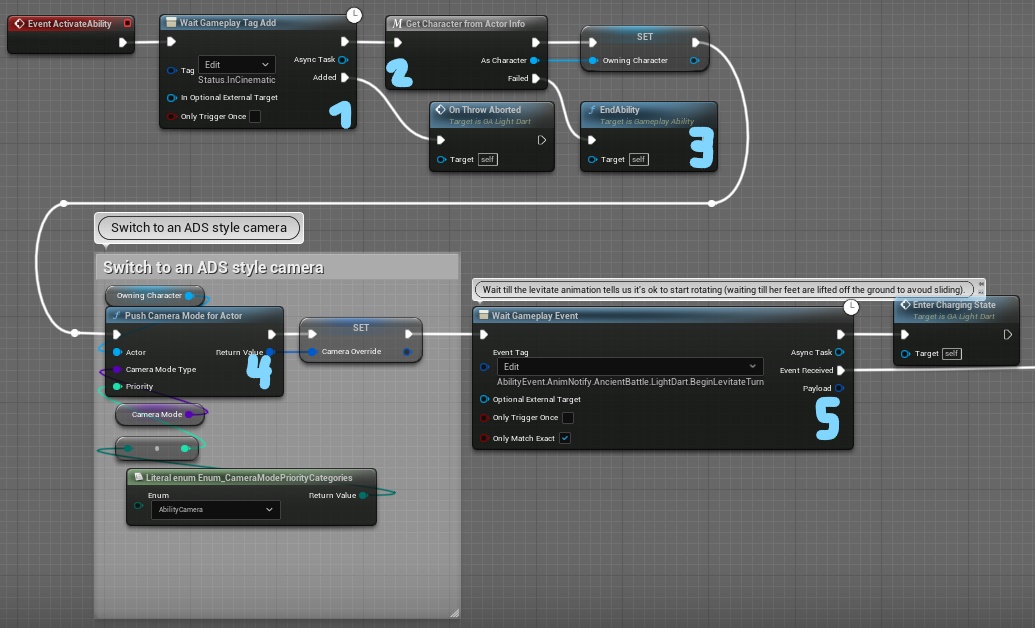
Numbered nodes explanation:
- Waits until the Status.InCinematic tag is added. If added, it calls OnThrowAborted to abort the ability.
- ActorInfo holds all the information relevant to our Ability System Component (ASC). Within this information we can find the Avatar, which represents the physical Actor that executes abilities.
- EndAbility should be called when we want to terminate the ability and remove all the tags added in the controllability phase.
- This node isn’t related to the ability system. It simply mutates the camera with certain specified configuration determined by the passed-in Camera Mode class.
- Similar to the WaitGameplayTagAdd node, it waits until the specified gameplay tag event is triggered. Right after the execution of this node the blueprint calls Enter Charging State. If the event is received, it performs a smooth rotation over Echo’s root.
3. Charging State
Following this, the character begins to levitate, spawning particles and triggering sounds, for that, this project uses the gameplay cue system. When this happens, Echo reduces their movement speed and starts casting the Light Dart.
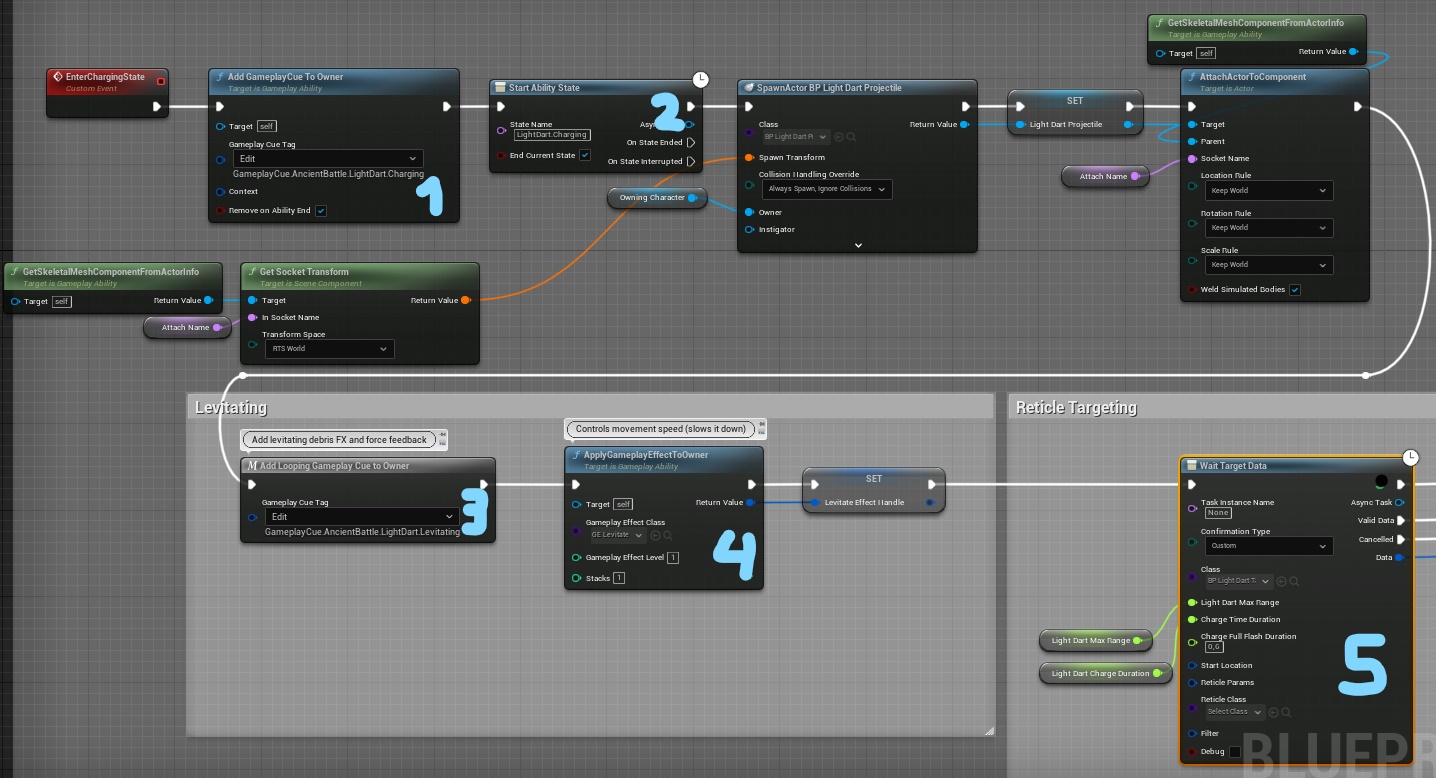
Numbered nodes explanation:
- Adds a gameplay-cue to the owner, in this case it starts the orb charging animation.
- Abilities can also define their own internal state and react accordingly when their state is ended through its neighbour node End Ability State.
- Similar to 1, however this time we are adding a looping cue (looping animation or sound). In the case of this ability, it makes Echo levitate in place while we hold the button.
- As we commented before, Gameplay Effects can modify attributes, in this case it mutates the MoveSpeed value that sets its new value directly in the Character Movement Component (CMC).
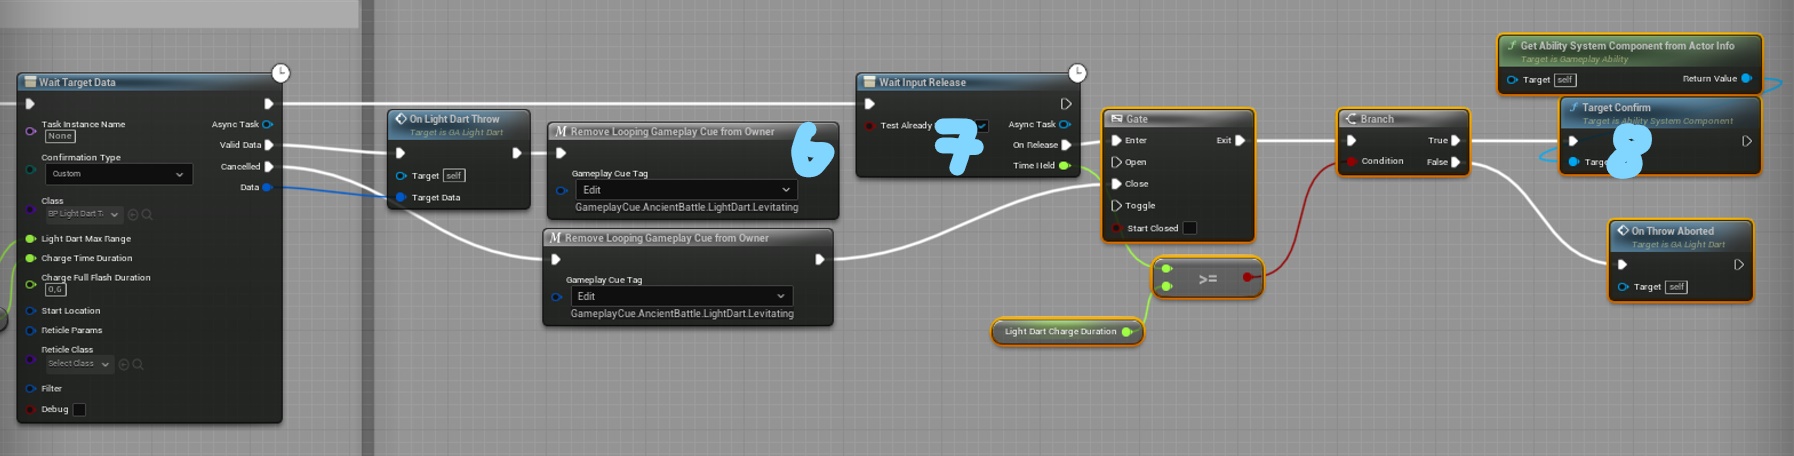
- Expects the ability activator to provide target data over a target actor special class. In this case it’s waiting for the target actor to define the aim vector to throw the Light Dart.
- Removes a looping cue giving a tag handle. In this case, if we obtain valid data from the target actor, Echo stops levitating.
- Waits for the input to be released.
- If the user releases the input, the Wait Target Data node executes the Valid Data output.
3. Throwing the projectile
Assuming the target actor returned valid data, we can proceed with the launch of the projectile.
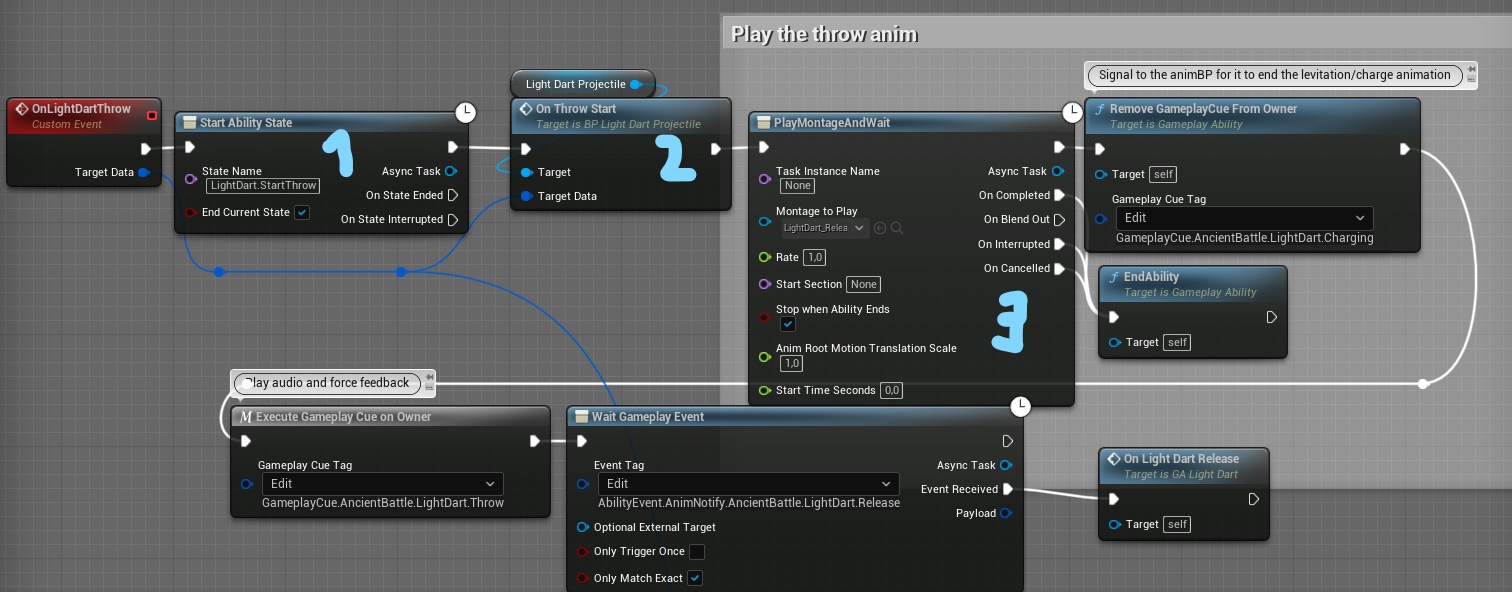
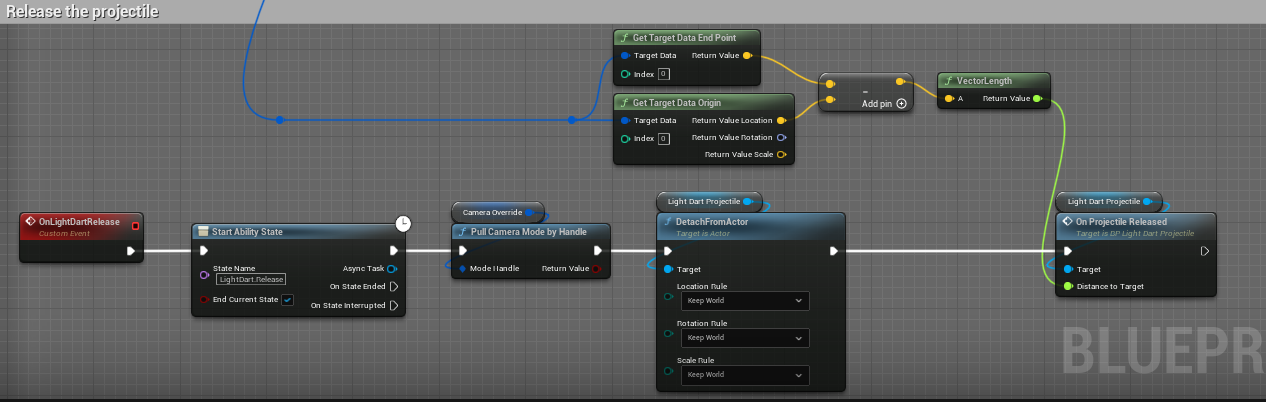
Numbered nodes explanation:
- Starts the throwing internal state.
- Preparing the projectile actor to be thrown.
- Reliable animation node that plays a montage for the animation. In this case it ends the ability if the montage is completed. If we follow the execution path we can see how Echo waits for a gameplay event to release the Light Dart in the precise moment. In this case it comes from an animation notifier contained within the LightDart_Release_Montage animation.
That’s it?
And that’s about it. The graph has more to it, but this is the essence of the implementation of the ability. Still, If you want to learn more about this specific ability you can download the Valley of the Ancient Sample by Epic Games.
As you can see, implementing an ability isn’t that complicated once you grasp the basic GAS concepts. There are more advanced concepts such as Stacking or Ability costs, but these are simply additional features to make your life easier. If you want to learn about them, take a look at the resources Section at the bottom of this article!
Lyra: A GAS Multiplayer official example
With the release of Unreal Engine 5.0 Epic released Lyra, an official multiplayer feature-complete example that we can look at and learn good practices about GAS. Lyra is a modular sample project using techniques already explored in Fortnite. Learn more about it here:
The cons: Not so plug-and-play
Using GAS and creating abilities is easy. That’s clear. Then… what’s the problem?
The setup
Setting up GAS involves writing hundreds of boilerplate lines of code. Literally hundreds. The system is not really plug-and-play, although some Epic staff have recently commented that they would like to make the setup more user friendly so that people can start using the system without spending hours adding initialization code.
Also, multiplayer games require to do pretty specific setups to simply initialize GAS. For example some games might require adding the component in the PlayerState, while some others in the Character (see Dave Ratti from Epic’s answer to community questions #5):
- Plan to add the ability system component in the player state?
- Be prepared to write hundreds of code in your avatar Actor to use it as a replication proxy if you don’t want to boost the net update frequency of the PlayerState.
- Understanding the difference between the Owner (actor which has the component) and the Avatar (actor which uses the component) of the Ability System Component is key.
- Network roles: Being autonomous proxy in the character doesn’t mean being autonomous proxy in the PlayerState. This can cause some confusion as some functions in the Ability System framework use the Owner’s role instead of the Avatar’s role (ie. Gameplay Effect application).
- Plan to add the ability system component in the pawn?
- No biggie. This one is easy, you won’t have to worry much about networking stuff.
- Non-persistent ASC unless you pool your pawns.
Adding attributes and abilities
There is not an standardized way of adding attributes and abilities to your Actors. I’ve read around ways of doing it… but I feel we are missing a handbook of good practices coming from Epic themselves. Adding and initializing attributes and abilities can get pretty complicated in multiplayer games due to replication and possible data races.
One example I found recently was binding an ability to an input action using the Enhanced Input plugin. But really, most of the time you feel like you are work-arounding issues setting up the system to work.
But once it’s setup…
Once set up, the system is quite easy to use and intuitive. Game designers will love it! And scaling it up is quite easy.
Like everything else, when it comes to code design, it is just a matter of learning the tools provided by the system and using them appropriately to solve different problems (see Dan’s GASDocumentation):
- Creating new tasks
- Damage Calculations
- Non-ability code that interacts with the system
- And so on…
Relevant resources
Let’s now list some resources that helped me getting introduced to the Gameplay Ability System.
Epic
Community
- Dan’s GASShooter
- Dan’s GASDocumentation
- KaosSpectrum’s The Games Dev
- Slacker’s gameplay-ability-system channel.
As always, the best recommendation is to check the engine’s source code.
Enjoy, vorixo.